Showing posts with label foto tip Friday. Show all posts

At a Level.....Foto Tip, ok Sunday....

My quite obvious failings at actually posting the Foto Tip Friday on a Friday are clear, again I apologize and hope that this wonderful tip may recover something!  

So i realized that although most of the tips I post are pretty simple stuff I haven't really touched on the core areas of Photoshop, so looking at tools and adjustments such as curves, levels and saturation.  These tools have been used within previous posts but not actually gone into great detail about the use of each so I thought it time to get some of that out there as its likely there are some of you out there who would like to know more about what they do.

Lets start with Levels.  This tool is essentially used to set the highlights and shadows within the image and to make sure that your picture has a generally nice tonal range and contrast.

You can find the Levels tool in the Adjustments menu and it will show you a histogram of the shadows and highlights within the image.  You are essentially aiming to make the lightest point of the image white without burning the highlights out and then keep the dark bits of the image dark and solid, not dull.  You do this by dragging the 3 pointers within the histogram left or right accordingly, the far right pointer effecting the highlights, the far left the shadows and the centre pointer the mid-tones of the image.


One way of identifying where the greatest shadows/ highlights are without just looking at the histogram is to switch to the threshold display mode, this then helps you to discern more easily where the greatest areas of dark and light are within the image.  If you want to adjust different areas of the image at a time, then use the Levels tool in different adjustment layers.  (For more info about adjustments layers see this post)


There are further things to do with Levels and above is a general overview, for a more in depth approach then there are a few books you can look at (Martin Evening is good) or some websites here and here.)


Foto Tip Friday....Portraits...

At the moment I am trying to improve my portraiture knowledge and execution.  Practically everything taken in terms of photography which isn't still life is portraiture so why I didn't think to give it more attention in the past I don't know.  Its about capturing an emotion, an expression, a moment, even a brand image all in one persons face or eye, arm, leg or shoulder.  Sounds odd but who said portraiture had to be a head and shoulders passport style image and is essentially the 2d version of a very 3d subject matter!  Anyway, the tips and tricks this week are some of my own, some given to me and some from the net.  There are some amazingly talented portrait photographers out there so research and be inspired! 
  • Minimize a round face by using some back lighting and having the sitter straight onto the camera
  • Make the person laugh - everyone looks beautiful when they laugh
  • Capture movement - weather it be a smile, a laugh, get the sitter to relax and move. This 'movement' and energy is reflected in the images
  • Be a sitter yourself and understand how it feels to be the other side of the camera
  • Shoot with the head turned slightly to one side, not full profile
  • Create a stronger, taller image by having the person lift their chin slightly
  • Cover any scars or areas the sitter may not like by using lighting and having these areas in the shadow
  • Pull shoulders and arms back
  • A long narrow face - Get the sitter to look down ever so slightly
  • Tell a story
  • If cropping tight, don't concentrate on putting the eyes in the middle of the viewfinder, have them in the top third of the frame
  • Play with eye contact
  • Look at other peoples portraits, what do you like and what don't you like? What makes it a strong image? How can you be different?
  • And of course, last but not least....experiment.
Some Portrait Photographers I admire (various disciplines).....Martin Sholler, Cindy Sherman, Cecil Beaton, Ansel Adams, Herb Ritts, Linus Ricard, Charles Freger, Tina Barney, Mary Ellen Mark, Alistair Guy, David LaChapelle,Annie Leibovitz - the list goes on! 

Eye Eye Captain...


Foto Tip Friday actually on a Friday....what is the world coming to!
So just a quick one this week but essentially its about improving skin in your photograph.  I only tend to really work on skin for fashion or beauty images but you can go overboard and that clone stamp can create a lot of softness.  This is purely what I do to improve texture, remove blemishes and so forth so take what you will out of it.

  • One you have messed with exposure and colour balance etc I would then start any skin work.  
  • Keep editing bits and then look at what you have as a whole, its seriously easy to get carried away and not realize the difference being made.
  • Take regular snap shots to see your progress
  • I use quite a high opacity brush for skin cloning (between 11 - 22) and do all the work on a separate layer, i then lower the opacity of that layer if needed.
  • Use a bigger brush on the forehead, cheeks and chin and then get smaller around the mouth and the eyes.
  • The eyes are particularly important hence the image.  Using too much cloning can really make them soft and  you lose the impact.  It is also important to not go overboard on removing dark circles or wrinkles as these all add expression.  
  • Work slowly, adding more as you go.
  • I use a harder clone brush around the eyes so things aren't quite as soft and in areas where feasible i use the spot healing brush.  Again on around 11-22 and the larger the better.
  • Use your history brush on 'Multiply' to accentuate the lashes and the eyebrows.  I also use it like an eyeliner to create some definition if needed.
  • Use a high pass sharpen action if you want more sharpness but remember this will bring out pores and lines Don't remove all the pores in the skin, this is not realistic.  Fade some and even ger rid of some but dont remove entirley otherwise the model will look like a doll.

Got your own tips? Know a great way to improve pics...get in touch and show people what you've got!

It's all in a question....


Wow I really do need to get better with these Foto Tips Fridays, this was has been relegated to a Tuesday!

I have been asked a lot this week about starting a business and getting clients. With really taking mine by the horns & giving it and myself a much needed kick up the butt I suppose it attracts these kind of queries but to be honest... I don't have a clue! I often turn to friends, family and colleagues (yes including other photographers) for advise and find nothing better than just talking a really good way to start the brain ticking. If you and solely you are your business then it is hard to step outside the box and look at what others see or at what opportunities you have around you. This really is probably the most important bit of advise I can give. Grasp every opportunity you have around you, speak to others about getting your work out there and let everyone know you exist and are in the market to take some pics. Do not be afraid of criticism & once you start building client relationships...ask them what they think and why they use you. Thats it, thats the advise....don't be afraid to ask, ask, ask and grab, grab grab at opportunities!


Mad Hats and Mooooo's....


November for me is a month of madness with birthdays literally around every corner. My bank card shivers in my purse & I avoid checking my bank balance between now and pretty much February next year. Its the safest option and avoids an embarrassing and rather dramatic breakdown.

In a slightly 'fashion plus I have nothing else to talk about' post I went to a mad hatters tea party last night and am proud of the efforts made by all, in particular the birthday gal herself who decided (clearly while consuming high percentage alcohol and at a early morning hour) to make a rather imposing hat made from a beer box and other random mag cuttings. It seemed to have a theme per side which included a Tea bar, a Post Box and some kind of mouse hole. Needless to say it didn't actually stay on her head long as it turned out her head is a lot smaller than we all originally thought but it made an excellent centre piece for the table.


Getting back to the work front I have just done 10x £50 vouchers for location portrait shoots which are going to St Marys Primary school in Burghfield. They are going to go into the raffle so if you are there, grab yourself one and get some money off a shoot. I am donating 10% of any pictures sales back to the school which makes me feel a bit gooey inside because its a nice thing to do and the school is the nicest ever! It is so tiny and reminds me of that lady that lived in a shoe with all her kids. No i'm not talking something you saw on JKyle last week but there was an old lady who lived in a shoe. That story. Anyway its a delightful little school and I am proud to be situated in such close proximity.

Foto tip Friday to come: Skin and a collection of CS3 tips!


Now you see it now you don't....

The liquify tool in Photoshop can be a very handy one....now before I start receiving hate mail don't think that this is just used for slimming people down or making models in magazines all that we aspire to me and realistically cannot reach. Yes of course, it is great at that but it can be used for other things away from the fashion world. Things that bar the whole 'we are labeling as right or wrong or acceptable or not' thing sorry but brides don't like a double chin and my mum would love it if I could make her arms look a little more slinky. Just the way it is.

With that in mind the liquify tool can be used to do such things in wedding, portrait, fashion a
nd dear lord even landscape photograph
y and that slightly dumpy blue tit who is dominating too much o
f your focus. It doesnt work if too dramatic, especially if on portraits because people do know what they look like. It can however just tighten up an image.

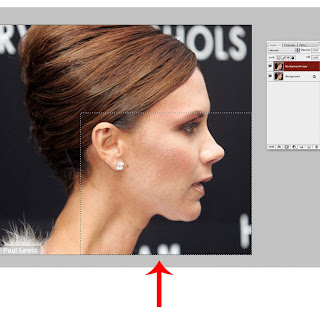
Some examples for you below - Viccy B's chin....well come on she is just upset this picture has reached the www before it was retouched and also a gentleman's jowl. Plus a little arm recovery. Use it where you will just use it wisely! ;-)

Vick B
Fig 1: Here we have the pic where I am going to reduce the chin
a little. It doesnt need much a
nd less is definaltley more if you ask me. First duplicate your background layer, this just makes it eas
ier to q
uickly see the difference and also start again if you dont like the results.
Once duplicated use the Rectangular Marquee tool to select the area that you are going to liquify. Always select a large area around the actual alternation zone as the change needs to be gradual and l
ook as natural as possible. The larger area you can select the better really.

Fig 2: I use a grid when i liquify as it helps me to see how m
uch I am actually doing. Also bare in mind any straight lines in th
e background - these of course will bend however you bend / amend other areas of the image. Start with a large brush, you can see from the image this brush is probably the size of Viccy B's chin. Gently use the brush to push the 'sag' up. Bare in mind this can shorten the face so you may need to ever so slightly pull the chin forward as well. Also watch for the chin going pointy. Remember don't go overboard, people are not meant to notice this has been done!
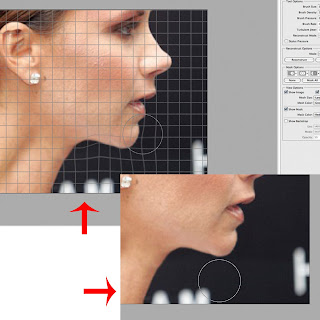
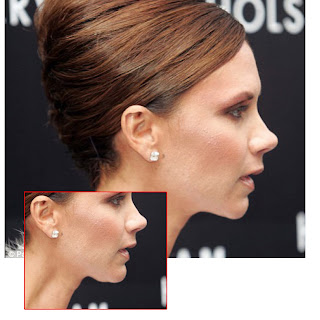
In the insert you can see the
finished piece - I have taken the grid away and the results are easier to see. Note I have also slightly reduced th
e adams apple as if you reduce everything around it this is then
going to stick out even more.

See Fig 3 for the final results - before and after.


Man Chin
Well not wanting to offend friends or family I got this image from google images so hopefully all ok there if they guy has al
ready decided to post pics of himself in his under crackers online. So same principles apply. New layer, rectangular marque tool and a large brush in liquify. If you don't know how to get to
liquify go to filter, you will see it there. The shortcuts for Mac are CMD/Arrow/X.
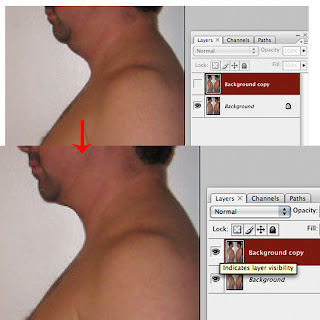
So you can see on this image, Man Chin I have reduced the sag. Again it has to be natural and gradual to look like its not really obvious. The use of the bigger brush means lines remain smooth rather than lumpy, its really a case of experimentation and you will see what I mean. As well as tuck
ing the chin in you want to lift it up, as before I have also extended the end of his actual jaw/chin out slightly to avoid it looking as if he has no real jaw line or his face is too short.

Arm
Often ladies complain of there arms when in dresses and so forth and this can easily be solved using the liquify tool. Now in this instance you have to slim the whole arm generally and also the top of the arm . I would also recommend using the clone tool to slightly reduce the size of the crease, between arm and body basically. It is this line that needs to remain relatively smooth and without lumps to achieve the look I imagine you will want.

I find using a slightly smaller brush is better to avoid effecting the bust and so forth but still keep it big enough to be natural and not create odd points or lumps. Again, you will need to select a large area, i would recommend from top of the neck right down to the wrist or even waist, this gives you plenty of room to be as realistic as possible.

In this example I haven't actually used the clone tool although you can see the line could do with reducing slightly.

Other things the liquify tool can help with is to help open eyes, say on babies. Not from shut to open by any means but if an eyelid has slightly drooped maybe you caught them mid blink or something, you can just slightly adjust to bring the eyes in line with each other. I believe the liquify tool has now been brought to the i-phone so hey - you know the fun that can also be had!!

For any hints and tips you would like to see or any comments or suggestions on those existing, please feel free to contact me on hello@carli-art.co.uk.


Foto tip Friday.....lighting at home

I rarely use studio lights as I just prefer working with natural light. I prefer its subtleties and also manipulating it to get the effect I want. I could certainly do with more training / practice in this area but out of the two its what I do best. That is not to say studio lighting isn't great. If I had the time and the confidence I reckon I could really get into creating some amazing effects, after all photography is the capture of light and if you know what your doing with it your practically there!
Anyway, before I start babbling on I thought I would provide some quick tips on creating lighting at home, studio style or location.

- You don't have to have professional lights. Experiment with halogen lights as these are probably the most neutral in terms of colour. AVOID fluores
cent as they will create a real hue which will be hard to get rid of, unless of course you want that effect.
- Tungsten light (your average lightbulb) can work really well just bare in mind it creates a slight yellow hue on everything and often, is not as bright as your average halogen bulb.
- Manipulate the light using reflective surfaces. You can buy professional reflectors from Ebay (for example) or you can even use things such as white, silver or gold bits of card.
- Use dark card or surfaces to absorb light where you want to. Use the reflector and the darker colours together to create the situation you want, or as close as.
- Use windows!! French doors can create beautiful light as it streams in. Use this to your advantage standing your subject parallel to this light.
- Soften light using natural tights or even pieces of tracing paper. (Beware of fire hazards here!)
- For more shadows use less light, say just one at an angle. For more even light use more. 3 or 4 lights should be more than enough and should eliminate all shadows and give you a 'high key' finish.
- May sound obvious but don't shoot directly into the light unless you are trying to create a silhouette effect.
- If you are trying to achieve a slight lens flare or a glare in the camera then don't shoot direct into the light but slightly at an angle. Move around and move your subject and you will find the right point. This is where digital camera's are an advantage as you can check and shoot until you have it right.
- If outside and using natural light then first thing in the morning when the sun is rising and last thing in the afternoon as the sun drops are the best times to get images. The light is soft, directional and you can achieve a number of effects with beautiful contrast between shadow and light.
-Experiment! That is what you need to do most of all. Get items or your mates and just have some fun. Work with the light, manipulate it and see what you can do.


Foto Tip Friday.....What Camera?


So Foto Tip Friday hey, here it is! I have done random postings in the past which vary, so everything from photoshop tips, choosing the right camera, lighting, copyright, pricing and so forth. It seems like there would be loads to write about but its often difficult deciding if I know enough about a subject and therefore can write about it. I have decided to therefore just write what I know! There are a million Photo Techniques and Tip sites out there so the internet is a great resources for learning more.

For some of the old lessons see below.


Today I am going to talk about buying a camera. I have posted about this before and included it on my discussions in the Facebook group however it is a question I get asked all the time, so thought it doesn't hurt to throw it up here again. Next week, we can tackle something new!

So, you have decided to buy a digital camera. Now are you going for SLR or soemthing you can throw in your handbag and take on a night out? This should be one of your first questions and if you dont know, then budget is always a good place to start!
  • How much do you have to spend?If you are looking at more than £250 then I would say yes, go for an SLR. Why not?! You can get a whole load of decent camera's these days which give easy, user functions alongside changeable lenses and large memory.
  • Memory isnt everything! I am not saying that a 14mb camera isn't any better than an 8mb but its not all about size! The majority will depend on the processor within the camera and also the functions it has in terms of if you have the option of shooting JPEG, Tiff or Raw. So don't just think big! Raw is the best 'type' of image you can shoot, Tiff being the next one down and then JPEG. Bare this in mind if you are looking at shooting high speed stuff or if you know you will be photographing things in the dark or low lighting conditions.
  • Size again! Ok so look at the size of the camera. If you are just using it to take on a night out then you don't want something big and bulky. Test them in your hand and carry them around, get a weight and size that is comfortable for you and where you may be using it.
  • I personally would recommend leaning towards the larger companies like Canon, Nikon, Olympus and Sony. They aren't market hoggers for nothing!
  • Check out the menu on the camera. Is it easy to use, are the buttons in the right place for you. Does it have enough options for you if you want to try something a bit wacky? IS feature packed your thing or do you just want a point and shoot? Also, if you are looking at SLR then does it have a manual mode so that it gives you the opportunity to take your photography skills to the next level if you wish?
  • Remember you are probably be going to be buying another camera in 2-3 years so get something you are comfortable with as chances are you will buy the same make next time.
  • Optical Zoom is better than digital zoom. Optical zoom is actually the lens moving close towards the subject whereas digital zoom the software within the camera is doing this and making up a fair percentage of the pixel data on the way. Optical zoom will be clearer, sharper and retain more detail. It will be more expensive but if you think you need it or would like something that looks in focus when you zoom in then I would recommend looking at something with an Optical zoom function.
If you have any tips that you want to share, any other pieces of advise that you would like to add for those buying camera's or anything that you would like to learn about and have me post here the please just get in touch. Comments below or pop an email to carli@carli-art.co.uk
C x