Showing posts with label Hint. Show all posts

Limited edition Xmas Voucher...


Carli-Art photography would like to wish everyone a very Merry Christmas and in doing so has just 20 of these £50 vouchers to spend on a location portrait shoot.

With 10 already donated to St Mary's school in Burghfield there are just ten vouchers remaining, so grab yourself one while they are hot! All you need to do is recommend a friend to my blog or my Carli-Art group on facebook.

Blog - Get your friend to follow me or add me as a favourite
Facebook - Ask your friend to write on my wall and you will each get a voucher.

Its that easy and there are no catches! Just £50 off Carli-Art photography location portraits, valid all the way up until June 2010.


Crimbo clicking and the week ahead....


I have been working on Christmas the last few weeks as although I predominantly concentrate on doing corporate or PR photography for firms or venues to use for marketing in future, this year I am also doing a guest driven photography package.
This isn't like some other Events photographers that you see where a studio set up is available or an area reserved for pictures and hen printing on site, I am offering a relaxed, guest driven image service capturing reportage pictures of the evening alongside posed pictures of friends and guests together - where they want to be. So at their table, on the dance-floor or at the reception having a drink.

Now this is a larger challenge for the photographer as more of a concerted effort has to put into seeking the guests and asking them if they would like their pic taken. It also leaves a lot of the lighting situation out of your hand or rather more for you to deal with. There is then the distribution of the cards and letting everybody know where they can see and purchase the pics. That said I love these challenges, I truly believe the images are far more fun, relaxed and really capture the atmosphere of the event and the emotions shared between the group being photographed. I get to build a report and we can have a laugh together and get an image that really is all about them and that, I love!

If you would be interested in finding out more, please feel free to drop me a line on hello@carli-art.co.uk

__________________________________________________________________

It being a Sunday and me having tried to work all day but spent a lot of it perched on the armchair watching TV 'just for a moment though' before going back to work; I felt it necessary to introduce you to the week ahead. We have a whole week of interviews with photographers!!! I wanted to do this to give you a feel of what other photographers were about and also some advise or experience that I was unable to offer. I have spoken to a range of photographers but have a couple that specialize in portraiture and weddings, a side I don't too often touch on here.
Therefore, prepare yourself for interviews with the following beauties:

  • Tuesday: Emma Coleman from Blink Photography
  • Wednesday: Bob Kirchstein from Opal Creative
  • Thursday: Elayne Barre from Elayne Barre Photography
  • Friday: Double trouble with Kat and Hannah from Artis Studios.

Any last minute questions you want to ask? Get in touch@ hello@carli-art.co.uk

Enjoy the rest of your Sunday! x


Foto tip Friday.....lighting at home

I rarely use studio lights as I just prefer working with natural light. I prefer its subtleties and also manipulating it to get the effect I want. I could certainly do with more training / practice in this area but out of the two its what I do best. That is not to say studio lighting isn't great. If I had the time and the confidence I reckon I could really get into creating some amazing effects, after all photography is the capture of light and if you know what your doing with it your practically there!
Anyway, before I start babbling on I thought I would provide some quick tips on creating lighting at home, studio style or location.

- You don't have to have professional lights. Experiment with halogen lights as these are probably the most neutral in terms of colour. AVOID fluores
cent as they will create a real hue which will be hard to get rid of, unless of course you want that effect.
- Tungsten light (your average lightbulb) can work really well just bare in mind it creates a slight yellow hue on everything and often, is not as bright as your average halogen bulb.
- Manipulate the light using reflective surfaces. You can buy professional reflectors from Ebay (for example) or you can even use things such as white, silver or gold bits of card.
- Use dark card or surfaces to absorb light where you want to. Use the reflector and the darker colours together to create the situation you want, or as close as.
- Use windows!! French doors can create beautiful light as it streams in. Use this to your advantage standing your subject parallel to this light.
- Soften light using natural tights or even pieces of tracing paper. (Beware of fire hazards here!)
- For more shadows use less light, say just one at an angle. For more even light use more. 3 or 4 lights should be more than enough and should eliminate all shadows and give you a 'high key' finish.
- May sound obvious but don't shoot directly into the light unless you are trying to create a silhouette effect.
- If you are trying to achieve a slight lens flare or a glare in the camera then don't shoot direct into the light but slightly at an angle. Move around and move your subject and you will find the right point. This is where digital camera's are an advantage as you can check and shoot until you have it right.
- If outside and using natural light then first thing in the morning when the sun is rising and last thing in the afternoon as the sun drops are the best times to get images. The light is soft, directional and you can achieve a number of effects with beautiful contrast between shadow and light.
-Experiment! That is what you need to do most of all. Get items or your mates and just have some fun. Work with the light, manipulate it and see what you can do.


There to be broken....


I am a firm believer in rules are there to be broken, i speak here in terms of photography and art. Of course in life, some rules you really are better off not breaking (like shooting your school bully in the back with a pistol or running naked through your local supermarket)

I say this because sometimes people are too caught up in what is 'meant' to be or how they got taught it 'this way or that way' so it must be right. Plop. Who says it must be right. Who says that this looks better than that. Art, photography, fashion - its all just a matter of opinion. Guidelines yes are useful and those age old methods we are all familiar with do come into play, they would not be around still today if somebody didn't think they were useful - but that doesn't mean you have to do it that way or you cant experiment yourself.

This does not mean you should not be aware of the rules or not have knowledge of them, thats not what I'm saying, I mean you need to know what your breaking first. Its just You just are allowed to break them!

Fashion photography is all about experimentation and some of the best and well know photographers are just that because they have stepped outside of the box and tried other things. Yes - once they have understood the rules they are stamping all over them!

Here are a few things other artists or photographers have to say on the matter:

Pro Fashion Photographer Adriana Curcio
Whomever said “rules are meant to be broken,” was on the right track. I was taught the correct way to light my subjects, and for a long time that’s what I did. After a few fortunate accidents, I realized there’s something to be said about high contrast, and dramatic lighting. Not everything needs to be lit just so, or be perfectly flattering. Bend and break the rules, and see what you find. You will surprise yourself.
http://digital-photography-school.com

Pro Fashion Photographer Jake Garn
I learned that the rule of thirds may actually be just a lazy man’s sham. That’s right, I said it… a lazy sham! On the surface the rule of thirds doesn’t really make a ton of sense, I mean why would a composition broken up into three equal parts be innately more appealing than any other random spattering in a composition?
http://jakegarn.com/

Pro Photographer Ellen Von Unworth
I think its important to know what you want. I'd rather go into the street with my camera and go click, click. For me thats more important than having the perfect light or exposure.
'Image Makers Image Takers'

Andrew Goodall Pro Photographer
In photography, you will find that rules help you in the beginning, and some rules will stay with you throughout your career. The trick is to understand when the rules don't apply, or when you should choose to ignore them. This is the type of knowledge that can't easily be taught. It comes with experience, and is what gives you individuality as a photographer.

The rule of thirds is an excellent guide for a beginner learning about composition. Photos that are taken according to the Rule Of Thirds appear balanced. They satisfy our natural sense of visual order and simply look 'right.' Unfortunately, the world is not so easily organised as the rule, so it is impossible in nature to take every photo this way. Moreover, sometimes you may decide to ignore the rule, giving more impact to the photo by shaking up the normal balance of the composition.

Knowing and following the rules will make you a good photographer. Choosing how and when to break them will make you even better.
http://ezinearticles.com/?Creative-Photography---Rules-Are-Made-to-Be-Broken&id=1486722

Pete Williams Pro Photographer
Composition in photography is far from a science, and as a result all of the 'rules' should be taken with a pinch of salt. If they don't work in your scene, ignore them; if you find a great composition that contradicts them, then go ahead and shoot it anyway. But they can often prove to be spot on, and are worth at least considering whenever you are out and about with your camera.

(image courtesy of www.gallowmere.com)


Fancy some action?

One of the simplest things to do in Photoshop is setting up an Action - an automated task that you can assign to a batch of images, a whole folder of images or just a few that you pick. This could be something as simple as a certain way of saving things or resizing to certain dimensions but can go as far as your imagination will take you really.

I use actions to apply logos to my work when putting on social networking sites or shareware and I also commonly use it when doing particular events, adding a set standard 'curve' action to adhere to all images which I know in general, will work with everythi
ng. The other thing I tend to use it for is saving files when I am editing each one, saves you saving as each time and saves loads of time for more important stuff! (Like making a cuppa while all your work saves!)

The 'Action' tab can be found alongside the history tab and within the same palette. If yours is not visible then add it in your view function.

Basically what you are doing is recording an Action and then saving it so that you can use it on a load of other files later.


First you need to decide what action you are
saving, for this purpose I am picking 'Curves'. Open up one of the files from the batch of images you are going to edit and you think
will need a similar curve action on.

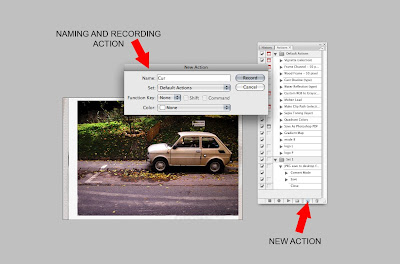
Once opened go to your Action Tab and click on the 'New' Icon as illustrated. Save your Action as something memorable - you can even colour code it if you wish to group your actions later. Once saved it is instantly recording and anything you do to that image will be saved within the 'Action.'


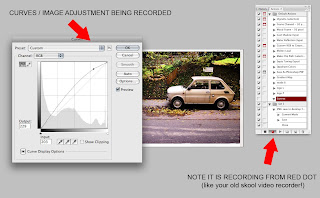
So curves - open up the curves (CTRL M or in Adjustments) and do a
standard curve that you like for contrast. Now save the image and close. Now stop the action using the stop button as illustrated.

Your action is now saved.

Now your going to want to apply this curves action to a whole bunch of images to save you a load of time where you could be otherwise watching the JK show or making yourself a coffee. Either way it saves you time and your mouse finger!

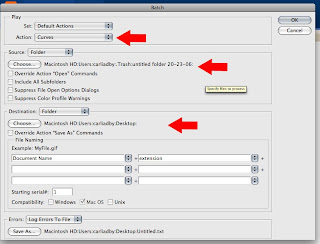
So still in photoshop, with action stopped and image closed, go to File - Automate - Batch. Once here you will be able to select the 'Action' you require (plus a load of automated pre loaded actions) and then the folder to which this action should apply.

You can then select how to save the images. So do nothing and they stay open or save them to a specific folder or location. You can even go as far as specifying different file names or extensions.

Once you have decided all of that (see red arrows) press ok, sit back and watch the action take place!

Yep, its that simple.

C x

All Glossy......


Feel like I should be writing some RIP piece about Jacko but there is so much around at the moment I decided it had probably all been said. Therefore in a bid to look for something else to write about I thought I would entertain myself with ambitions of fashion magazines that one day, I would like to feature in. Better start working on that and seriously - I am on a mission to get my shite sorted and actually start getting out there with my portfolio. Couple more fashion shoots to complete before August then POW - I am there baby!!