With that in mind the liquify tool can be used to do such things in wedding, portrait, fashion a
nd dear lord even landscape photograph
y and that slightly dumpy blue tit who is dominating too much o
f your focus. It doesnt work if too dramatic, especially if on portraits because people do know what they look like. It can however just tighten up an image.
Some examples for you below - Viccy B's chin....well come on she is just upset this picture has reached the www before it was retouched and also a gentleman's jowl. Plus a little arm recovery. Use it where you will just use it wisely! ;-)
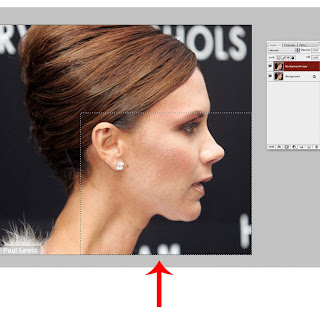
Vick B
Fig 1: Here we have the pic where I am going to reduce the chin
a little. It doesnt need much a
nd less is definaltley more if you ask me. First duplicate your background layer, this just makes it eas
ier to q
uickly see the difference and also start again if you dont like the results.
Once duplicated use the Rectangular Marquee tool to select the area that you are going to liquify. Always select a large area around the actual alternation zone as the change needs to be gradual and l
ook as natural as possible. The larger area you can select the better really.
Fig 2: I use a grid when i liquify as it helps me to see how m
uch I am actually doing. Also bare in mind any straight lines in th
e background - these of course will bend however you bend / amend other areas of the image. Start with a large brush, you can see from the image this brush is probably the size of Viccy B's chin. Gently use the brush to push the 'sag' up. Bare in mind this can shorten the face so you may need to ever so slightly pull the chin forward as well. Also watch for the chin going pointy. Remember don't go overboard, people are not meant to notice this has been done!
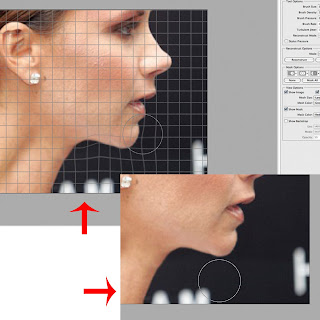 In the insert you can see the
 finished piece - I have taken the grid away and the results are easier to see. Note I have also slightly reduced th
e adams apple as if you reduce everything around it this is then
going to stick out even more.
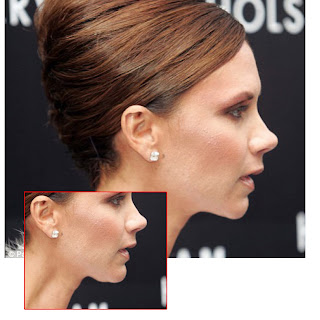
See Fig 3 for the final results - before and after.
Man Chin
Well not wanting to offend friends or family I got this image from google images so hopefully all ok there if they guy has al
ready decided to post pics of himself in his under crackers online. So same principles apply. New layer, rectangular marque tool and a large brush in liquify. If you don't know how to get to
liquify go to filter, you will see it there. The shortcuts for Mac are CMD/Arrow/X.
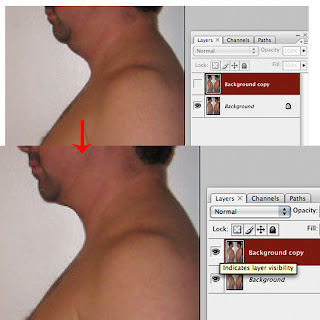
So you can see on this image, Man Chin I have reduced the sag. Again it has to be natural and gradual to look like its not really obvious. The use of the bigger brush means lines remain smooth rather than lumpy, its really a case of experimentation and you will see what I mean. As well as tuck
ing the chin in you want to lift it up, as before I have also extended the end of his actual jaw/chin out slightly to avoid it looking as if he has no real jaw line or his face is too short.
Arm
Often ladies complain of there arms when in dresses and so forth and this can easily be solved using the liquify tool. Now in this instance you have to slim the whole arm generally and also the top of the arm . I would also recommend using the clone tool to slightly reduce the size of the crease, between arm and body basically. It is this line that needs to remain relatively smooth and without lumps to achieve the look I imagine you will want.
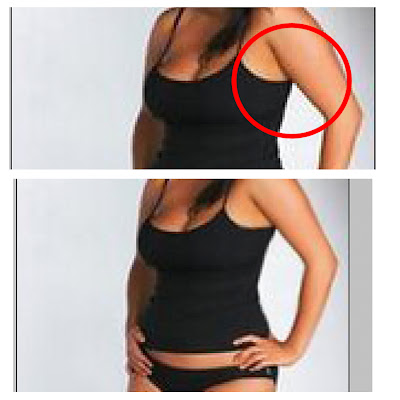
I find using a slightly smaller brush is better to avoid effecting the bust and so forth but still keep it big enough to be natural and not create odd points or lumps. Again, you will need to select a large area, i would recommend from top of the neck right down to the wrist or even waist, this gives you plenty of room to be as realistic as possible.
In this example I haven't actually used the clone tool although you can see the line could do with reducing slightly.
Other things the liquify tool can help with is to help open eyes, say on babies. Not from shut to open by any means but if an eyelid has slightly drooped maybe you caught them mid blink or something, you can just slightly adjust to bring the eyes in line with each other. I believe the liquify tool has now been brought to the i-phone so hey - you know the fun that can also be had!!
For any hints and tips you would like to see or any comments or suggestions on those existing, please feel free to contact me on hello@carli-art.co.uk.


